.htaccess 사용할 경우 apache server-status 접속

.htaccess 또는 rewirte 를 사용할 경우 https://localhost/server-status 주소에 접속하면 404페이지가 보일 경우가 있다.

RewriteEngine On
RewriteCond %{REQUEST_FILENAME} !-f
RewriteCond %{REQUEST_FILENAME} !-d
RewriteRule ^(.*)$ index.php/$1 [L]
RewriteEngine On
RewriteCond %{REQUEST_FILENAME} !-f
RewriteCond %{REQUEST_FILENAME} !-d
RewriteCond %{REQUEST_URI} !=/server-status
RewriteRule ^(.*)$ index.php/$1 [L]

index.php 로 가기전에 규칙을 하나더 추가해준다

Zabbix Agent 설치

zabbix 에이전트

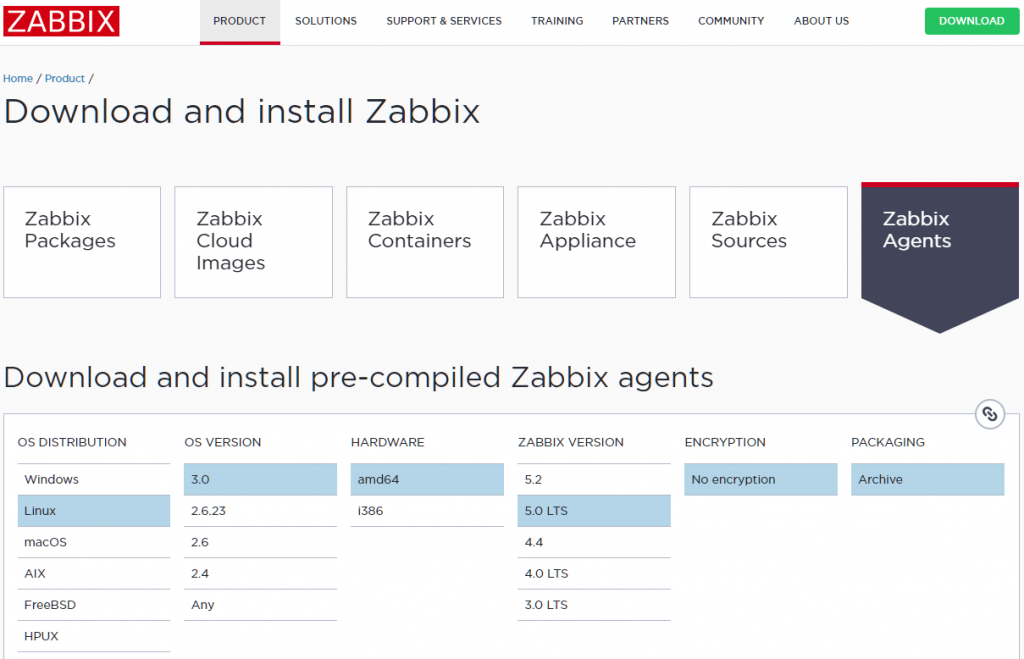
운영체제를 선택하고 zabbix 서버버전을 확인해서 에이전트를 선택하면, 아래쪽에 다운로드 링크가 나타난다

서버에 에이전트 다운로드

cd /usr/local
mkdir zabbix-agent
cd zabbix-agent

wget  https://cdn.zabbix.com/zabbix/binaries/stable/5.0/5.0.10/zabbix_agent-5.0.10-linux-3.0-amd64-static.tar.gz

에이전트 설치

tar xfzp zabbix_agent-5.0.10-linux-3.0-amd64-static.tar.gz

zabbiz 유저추가

sudo useradd -r -s /bin/false zabbix

환경설정파일 복사

cd /usr/local/etc
ln -s /usr/local/zabbiz-agent/conf/zabbix_agentd.conf .

에이전트가 시작할 때 -t 옵션을 사용해서 설정파일을 지정하지 않으면, /usr/local/etc/zabbix_agentd.conf 파일을 찾는다. 때문에 해당위치에 파일을 링크로 걸어둔다. 직접 환경설정파일을 지정하려면 -t 옵션을 사용한다.

zabbiz_agentd.conf 설정파일 수정

# 로그파일위치를 변경
LogFile=/tmp/zabbix_agentd.log

# Zabbix 서버아이피로 변경
Server=127.0.0.1

에이전트 시작하기

cd /usr/local/zabbix-agent/sbin
./zabbix_agentd

우분투에서 시작스크립트에 등록

cd /etc/init.d
ln -s /usr/local/zabbix-agent/sbin/zabbix_agentd .

방화벽 설정

iptables -A INPUT -s {server ip} -p tcp -m tcp --dport 10050 -j ACCEPT
iptables -A INPUT -s {server ip} -p tcp -m tcp --dport 10051 -j ACCEPT
iptables -A INPUT -p tcp -m tcp --dport 10050 -j DROP
iptables -A INPUT -p tcp -m tcp --dport 10051 -j DROP

Dante – Socks5 Proxy

패키지 설치

# apt update && apt upgrade -y
# apt install dante-server dante-client

환경설정

logoutput: syslog stdout /var/log/dante.log
internal: eth0 port = 1080
external: eth1
clientmethod: none
socksmethod: none
user.privileged: proxy
user.unprivileged: nobody
user.libwrap: nobody
client pass {
        from: 0.0.0.0/0 to: 0.0.0.0/0
        log: error connect disconnect
}
socks pass {
        from: 0.0.0.0/0 to: 0.0.0.0/0
        log: connect error disconnect
}

/etc/danted.conf

프록시 서버는 eth0에서 LISTEN, 트래픽은 eth1으로 나가게 한다.
eth0와 eth1은 각각 공인아이피를 셋팅했다.

테스트

# curl -x socks5://{프록시아이피}:{프록시포트} https://www.google.com

socksify

route {
        from: 0.0.0.0/0 to: 0.0.0.0/0 via: {프록시아이피} port = {프록시포트}
        protocol: tcp udp
        proxyprotocol: socks_v4 socks_v5
        method: none
}

/etc/dante.conf

dante-client 패키지를 설치하면 socksify를 사용할 수 있다.
위에처럼 설정하고 아래 명령을 사용하는 방법도 있다.

이 경우에는 socksify를 사용하는 프로세스는 모두 지정한 프록시를 통해서 통신이 된다.

# socksify wget -O- -q https://google.com

Redsocks – Tcp to Proxy Redirector

서버로 들어오는 패킷을 socks5로 내보내기 위해서 redsocks를 활용했다.
설명은 우분투 18.04 기준으로 한다

Redsocks 홈페이지

https://github.com/darkk/redsocks

패키지

# apt update && apt -y upgrade
# apt install redsocks

패키지 매니저로 설치한다

환경설정파일

base {
    log_debug = on;
    log_info = on;
    log = "file:/var/log/redsocks.log";
    daemon = on;
    redirector = iptables;
}
redsocks {
    local_ip = 0.0.0.0;
    local_port = 12345;
    ip = {프록시서버 아이피};
    port = {프록시서버 포트};
    type = socks5;
}

/etc/redsocks.conf

# systemctl restart redsocks

redsocks 재시작

# iptables -t nat -A PREROUTING --in-interface ppp0 -p tcp -j REDIRECT --to-ports 12345

ppp0로 들어오는 패킷을 redsocks 포트인 12345로 리다이렉트 시켜준다

CentOS 7 – 오라클 18c XE 설치

패키지 업데이트

# yum update
# yum install wget

패키지 업데이트를 먼저한다

다운로드

# cd /usr/local/src
# wget https://yum.oracle.com/repo/OracleLinux/OL7/latest/x86_64/getPackage/oracle-database-preinstall-18c-1.0-1.el7.x86_64.rpm
# wget https://download.oracle.com/otn-pub/otn_software/db-express/oracle-database-xe-18c-1.0-1.x86_64.rpm

설치파일 다운로드는 아래 링크에서 한다.
https://www.oracle.com/database/technologies/xe-downloads.html

설치 진행

# yum -y localinstall oracle-database-preinstall-18c-1.0-1.el7.x86_64.rpm
# yum -y localinstall oracle-database-xe-18c-1.0-1.x86_64.rpm

설치 사이즈가 커서 오래걸린다

초기설정

# /etc/init.d/oracle-xe-18c configure

Specify a password to be used for database accounts. Oracle recommends that the password entered should be at least 8 characters in length, contain at least 1 uppercase character, 1 lower case character and 1 digit [0-9]. Note that the same password will be used for SYS, SYSTEM and PDBADMIN accounts:
 Confirm the password:
 Configuring Oracle Listener.
 Listener configuration succeeded.
 Configuring Oracle Database XE.
 Enter SYS user password:                                                                                                           
 Enter SYSTEM user password:
 
 Enter PDBADMIN User Password:
 
 Prepare for db operation
 7% complete
 Copying database files
 29% complete
 Creating and starting Oracle instance
 30% complete
 31% complete
 34% complete
 38% complete
 41% complete
 43% complete
 Completing Database Creation
 47% complete
 50% complete
 Creating Pluggable Databases
 54% complete
 71% complete
 Executing Post Configuration Actions
 93% complete
 Running Custom Scripts
 100% complete
 Database creation complete. For details check the logfiles at:
  /opt/oracle/cfgtoollogs/dbca/XE.
 Database Information:
 Global Database Name:XE
 System Identifier(SID):XE
 Look at the log file "/opt/oracle/cfgtoollogs/dbca/XE/XE1.log" for further details.
 Connect to Oracle Database using one of the connect strings:
      Pluggable database: localhost.localdomain/XEPDB1
      Multitenant container database: localhost.localdomain
 Use https://localhost:5500/em to access Oracle Enterprise Manager for Oracle Database XE

비밀번호는 최소 1개의 대문자와 소문자, 숫자를 조합해서 8자이상 입력해야 한다.

환경설정 추가

# vi ~/.bash_profile

export ORACLE_HOME=/opt/oracle/product/18c/dbhomeXE
export TNS_ADMIN=$ORACLE_HOME/network/admin
export ORACLE_SID=XE
export ORAENV_ASK=NO
export PATH=$PATH:$ORACLE_HOME/bin

.bash_profile 파일 하단에 환경설정을 추가

리스너 확인

# lsnrctl status

LSNRCTL for Linux: Version 18.0.0.0.0 - Production on 01-FEB-2021 11:02:03
 Copyright (c) 1991, 2018, Oracle.  All rights reserved.
 Connecting to (DESCRIPTION=(ADDRESS=(PROTOCOL=TCP)(HOST=localhost)(PORT=1521)))
 STATUS of the LISTENER
 Alias                     LISTENER
 Version                   TNSLSNR for Linux: Version 18.0.0.0.0 - Production
 Start Date                01-FEB-2021 11:01:04
 Uptime                    0 days 0 hr. 0 min. 58 sec
 Trace Level               off
 Security                  ON: Local OS Authentication
 SNMP                      OFF
 Default Service           XE
 Listener Parameter File   /opt/oracle/product/18c/dbhomeXE/network/admin/listener.ora
 Listener Log File         /opt/oracle/diag/tnslsnr/localhost/listener/alert/log.xml
 Listening Endpoints Summary…
   (DESCRIPTION=(ADDRESS=(PROTOCOL=tcp)(HOST=localhost)(PORT=1521)))
   (DESCRIPTION=(ADDRESS=(PROTOCOL=ipc)(KEY=EXTPROC1521)))
   (DESCRIPTION=(ADDRESS=(PROTOCOL=tcps)(HOST=localhost)(PORT=5500))(Security=(my_wallet_directory=/opt/oracle/product/18c/dbhomeXE/admin/XE/xdb_wallet))(Presentation=HTTP)(Session=RAW))
 Services Summary…
 Service "XE" has 1 instance(s).
   Instance "XE", status READY, has 1 handler(s) for this service…
 Service "XEXDB" has 1 instance(s).
   Instance "XE", status READY, has 1 handler(s) for this service…
 Service "ba3db2e4206012dde055000000000001" has 1 instance(s).
   Instance "XE", status READY, has 1 handler(s) for this service…
 Service "xepdb1" has 1 instance(s).
   Instance "XE", status READY, has 1 handler(s) for this service…
 The command completed successfully

listener.ora

[root@localhost admin]# cat listener.ora
 listener.ora Network Configuration File: /opt/oracle/product/18c/dbhomeXE/network/admin/listener.ora
 Generated by Oracle configuration tools.
 DEFAULT_SERVICE_LISTENER = XE
 LISTENER =
   (DESCRIPTION_LIST =
     (DESCRIPTION =
       (ADDRESS = (PROTOCOL = TCP)(HOST = localhost)(PORT = 1521))
       (ADDRESS = (PROTOCOL = IPC)(KEY = EXTPROC1521))
     )
   )

tnsnames.ora

[root@localhost admin]# cat tnsnames.ora
 tnsnames.ora Network Configuration File: /opt/oracle/product/18c/dbhomeXE/network/admin/tnsnames.ora
 Generated by Oracle configuration tools.
 XE =
   (DESCRIPTION =
     (ADDRESS = (PROTOCOL = TCP)(HOST = localhost)(PORT = 1521))
     (CONNECT_DATA =
       (SERVER = DEDICATED)
       (SERVICE_NAME = XE)
     )
   )
 LISTENER_XE =
   (ADDRESS = (PROTOCOL = TCP)(HOST = localhost)(PORT = 1521))

포트번호가 바뀐경우가 있었는데, 그럴경우에 1521로 변경해서 저장하고 재시작 해준다

데이터베이스 접속확인

# sqlplus
SQL*Plus: Release 18.0.0.0.0 - Production on Mon Feb 1 12:59:38 2021
Version 18.4.0.0.0
Copyright (c) 1982, 2018, Oracle.  All rights reserved.
Enter user-name: system
Enter password:
Last Successful login time: Mon Feb 01 2021 11:23:03 +09:00
Connected to:
Oracle Database 18c Express Edition Release 18.0.0.0.0 - Production
Version 18.4.0.0.0
SQL>

데이터베이스 Start/Stop

# /etc/init.d/oracle-xe-18c start
# /etc/init.d/oracle-xe-18c stop

시스코 SNMP 설정하기

ACL에 허용할 아이피 추가

sys>en
sys# conf t
sys(config)# ip access-list standard 90
sys(config-ext-nacl)# permit host {허용할 아이피}
sys(config-ext-nacl)# exit
sys(config)# exit

ACL 설정한다.
여기서는 90번으로 추가했다.
허용할 아이피를 입력하면 그 외는 모두 차단된다.

ACL 확인

sys# show access-lists

Standard IP access list 90
     10 permit {허용할 아이피}

ACL 리스트를 확인한다

SNMP 커뮤니티 추가

sys# conf t
sys(config)# snmp-server community {커뮤니티이름} ro 90
sys(config)# exit

snmp 서버에 커뮤니티를 추가한다.

추가시 RO (read only) 권한으로 하며, 사용할 access-list 번호는 앞에서 추가한 90으로 한다.

SNMP 동작확인

sys# show snmp community

Community name: {커뮤니티이름}
 Community Index: {커뮤니티이름}
 Community SecurityName: {커뮤니티이름}
 storage-type: nonvolatile        active access-list: 90

snmp 정보를 확인해보면 커뮤니티와 access-list가 정상적인지 확인할 수 있다.

PhpSpreadsheet – Tips

$spreadsheet = new Spreadsheet();
$spreadsheet->getProperties()->setCreator('jongwan')
     ->setTitle('')
     ->setSubject('')
     ->setDescription('');

PhpSpreadsheet 초기화하기

$styleArray = [
     'borders' => [
         'allBorders' => [
             'borderStyle' => \PhpOffice\PhpSpreadsheet\Style\Border::BORDER_THIN
         ],
         'outline' => [
             'borderStyle' => \PhpOffice\PhpSpreadsheet\Style\Border::BORDER_THICK
         ]
     ]
 ];
 $spreadsheet->getActiveSheet()->getStyle('A1:D10')->applyFromArray($styleArray);

외곽선과 내부선을 스타일 지정하는 방법

// 숫자형 셀스타일
$spreadsheet->getActiveSheet()->setCellValueExplicit('A1', '내용', \PhpOffice\PhpSpreadsheet\Cell\DataType::TYPE_NUMERIC);

// 문자형 셀스타일
$spreadsheet->getActiveSheet()->setCellValueExplicit('B1', '내용', \PhpOffice\PhpSpreadsheet\Cell\DataType::TYPE_STRING);

// 지정없이 입력
$spreadsheet->getActiveSheet()->setCellValue('C1', '내용');

셀에 데이터타입을 지정하기

header('Content-Type: application/vnd.ms-excel');
header('Content-Disposition: attachment;filename="filename.xls"');
header('Cache-Control: no-cache');
header('Expires: Mon, 26 Jul 1997 05:00:00 GMT'); // Date in the past
header('Last-Modified: '.gmdate('D, d M Y H:i:s').' GMT+9'); // always modified
header('Pragma: public'); // HTTP/1.0
$writer = IOFactory::createWriter($spreadsheet, 'Xls');
$writer->save('php://output');

파일로 다운로드하기

// 첫번째 시트 선택 (0번부터 시작)
$spreadsheet->setActiveSheetIndex(0);
$spreadsheet->getActiveSheet()->setTitle('sheet name');

// 시트 생성하기
$spreadsheet->createSheet();
$spreadsheet->setActiveSheetIndex(1);
$spreadsheet->getActiveSheet()->setTitle("상세내역");

시트 생성, 선택, 이름지정하기

$spreadsheet->getActiveSheet()->mergeCells('A1:D2');

셀합치기(merge)

$spreadsheet->getActiveSheet()->getStyle('A1')->getAlignment()->setVertical(\PhpOffice\PhpSpreadsheet\Style\Alignment::VERTICAL_TOP);
$spreadsheet->getActiveSheet()->getStyle('A1')->getAlignment()->setVertical(\PhpOffice\PhpSpreadsheet\Style\Alignment::VERTICAL_CENTER);
$spreadsheet->getActiveSheet()->getStyle('A1')->getAlignment()->setVertical(\PhpOffice\PhpSpreadsheet\Style\Alignment::VERTICAL_BOTTOM);


$spreadsheet->getActiveSheet()->getStyle('A1')->getAlignment()->setHorizontal(\PhpOffice\PhpSpreadsheet\Style\Alignment::HORIZONTAL_CENTER);
$spreadsheet->getActiveSheet()->getStyle('A1')->getAlignment()->setHorizontal(\PhpOffice\PhpSpreadsheet\Style\Alignment::HORIZONTAL_LEFT);
$spreadsheet->getActiveSheet()->getStyle('A1')->getAlignment()->setHorizontal(\PhpOffice\PhpSpreadsheet\Style\Alignment::HORIZONTAL_RIGHT);

셀내용 정렬하기

$spreadsheet->getActiveSheet()->getStyle('A1:D5')->getFill()->setFillType(\PhpOffice\PhpSpreadsheet\Style\Fill::FILL_SOLID)->getStartColor()->setRGB('dddddd');

배경색 지정하기

phpspreadsheet 설치하기

# apt install composer
# composer require phpoffice/phpspreadsheet

컴포져phpspreadsheet 설치하기

Do not run Composer as root/super user! See https://getcomposer.org/root for details
 Warning from https://packagist.org: You are using an outdated version of Composer. Composer 2.0 is now available and you should upgrade. See https://getcomposer.org/2
 Using version ^1.16 for phpoffice/phpspreadsheet
 ./composer.json has been created
 Loading composer repositories with package information
 Warning from https://packagist.org: You are using an outdated version of Composer. Composer 2.0 is now available and you should upgrade. See https://getcomposer.org/2
 Updating dependencies (including require-dev)
 Your requirements could not be resolved to an installable set of packages.
 Problem 4
     - Installation request for phpoffice/phpspreadsheet ^1.16 -> satisfiable by phpoffice/phpspreadsheet[1.16.0].
     - phpoffice/phpspreadsheet 1.16.0 requires ext-dom * -> the requested PHP extension dom is missing from your system.
     - phpoffice/phpspreadsheet 1.16.0 requires ext-gd * -> the requested PHP extension gd is missing from your system. 
 To enable extensions, verify that they are enabled in your .ini files:
     - phpoffice/phpspreadsheet 1.16.0 requires ext-mbstring * -> the requested PHP extension mbstring is missing from your system. 
     - phpoffice/phpspreadsheet 1.16.0 requires ext-zip * -> the requested PHP extension zip is missing from your system. 
     - /etc/php/7.2/cli/php.ini
     - /etc/php/7.2/cli/conf.d/10-mysqlnd.ini
     - /etc/php/7.2/cli/conf.d/10-opcache.ini
     - /etc/php/7.2/cli/conf.d/10-pdo.ini
     - /etc/php/7.2/cli/conf.d/20-calendar.ini
     - /etc/php/7.2/cli/conf.d/20-ctype.ini
     - /etc/php/7.2/cli/conf.d/20-exif.ini
     - /etc/php/7.2/cli/conf.d/20-fileinfo.ini
     - /etc/php/7.2/cli/conf.d/20-ftp.ini
     - /etc/php/7.2/cli/conf.d/20-gettext.ini
     - /etc/php/7.2/cli/conf.d/20-iconv.ini
     - /etc/php/7.2/cli/conf.d/20-json.ini
     - /etc/php/7.2/cli/conf.d/20-mysqli.ini
     - /etc/php/7.2/cli/conf.d/20-pdo_mysql.ini
     - /etc/php/7.2/cli/conf.d/20-phar.ini
     - /etc/php/7.2/cli/conf.d/20-posix.ini
     - /etc/php/7.2/cli/conf.d/20-readline.ini
     - /etc/php/7.2/cli/conf.d/20-shmop.ini
     - /etc/php/7.2/cli/conf.d/20-sockets.ini
     - /etc/php/7.2/cli/conf.d/20-sysvmsg.ini
     - /etc/php/7.2/cli/conf.d/20-sysvsem.ini
     - /etc/php/7.2/cli/conf.d/20-sysvshm.ini
     - /etc/php/7.2/cli/conf.d/20-tokenizer.ini
   You can also run php --ini inside terminal to see which files are used by PHP in CLI mode.
 Installation failed, deleting ./composer.json.
# apt install -y php-xml php-gd php-mbstring php-zip

오류메시지를 확인하고 설치되지 않은 패키지를 설치한다.

Do not run Composer as root/super user! See https://getcomposer.org/root for details
 Warning from https://packagist.org: You are using an outdated version of Composer. Composer 2.0 is now available and you should upgrade. See https://getcomposer.org/2
 Using version ^1.16 for phpoffice/phpspreadsheet
 ./composer.json has been created
 Loading composer repositories with package information
 Warning from https://packagist.org: You are using an outdated version of Composer. Composer 2.0 is now available and you should upgrade. See https://getcomposer.org/2
 Updating dependencies (including require-dev)
 Package operations: 11 installs, 0 updates, 0 removals
 Installing ezyang/htmlpurifier (v4.13.0): Downloading (100%)
 Installing psr/http-message (1.0.1): Downloading (100%)
 Installing psr/http-factory (1.0.1): Downloading (100%)
 Installing psr/http-client (1.0.1): Downloading (100%)
 Installing psr/simple-cache (1.0.1): Downloading (100%)
 Installing markbaker/matrix (2.1.1): Downloading (100%)
 Installing markbaker/complex (2.0.0): Downloading (100%)
 Installing myclabs/php-enum (1.7.7): Downloading (100%)
 Installing symfony/polyfill-mbstring (v1.22.0): Downloading (100%)
 Installing maennchen/zipstream-php (2.1.0): Downloading (100%)
 Installing phpoffice/phpspreadsheet (1.16.0): Downloading (100%)
 phpoffice/phpspreadsheet suggests installing mpdf/mpdf (Option for rendering PDF with PDF Writer)
 phpoffice/phpspreadsheet suggests installing dompdf/dompdf (Option for rendering PDF with PDF Writer (doesn't yet support PHP8))
 phpoffice/phpspreadsheet suggests installing tecnickcom/tcpdf (Option for rendering PDF with PDF Writer (doesn't yet support PHP8))
 phpoffice/phpspreadsheet suggests installing jpgraph/jpgraph (Option for rendering charts, or including charts with PDF or HTML Writers)
 Writing lock file
 Generating autoload files 

설치완료