

[작성자:] aiseki@gmail.com
도로명주소 API 서비스
도로명 주소 API 서비스
행정자치부에서 제공하는 OPEN API 서비스
API 신청페이지
https://www.juso.go.kr/addrlink/devAddrLinkRequestWrite.do?returnFn=write&cntcMenu=URL
PHP + Snoopy로 주소찾기 예제
코드
[code lang=”php”]
<?php
require_once ‘Snoopy.class.php’;
$params = array(
‘currentPage’ => 1,
‘countPerPage’ => 5,
‘resultType’ => ‘json’,
‘confmKey’ => ‘{발급받은 키문자열}’,
‘keyword’ => ‘서울시 마포구 합정동 10’
);
$snoopy = new Snoopy();
$snoopy->httpmethod = "POST";
$snoopy->submit("http://www.juso.go.kr/addrlink/addrLinkApiJsonp.do", $params);
$response = $snoopy->results;
// 앞뒤에 ‘(‘, ‘)’ 문자를 제거한 뒤 json_decode()를 이용해 변환
$json = substr($response, 1, -1);
$obj = json_decode($json);
[/code]
출력결과
[code]
stdClass Object
(
[results] => stdClass Object
(
[common] => stdClass Object
(
[errorMessage] => 정상
[countPerPage] => 5
[totalCount] => 73
[errorCode] => 0
[currentPage] => 1
)
[juso] => Array
(
[0] => stdClass Object
(
[detBdNmList] =>
[engAddr] => 56, Tojeong-ro, Mapo-gu, Seoul
[rn] => 토정로
[emdNm] => 합정동
[zipNo] => 04082
[roadAddrPart2] => (합정동)
[sggNm] => 마포구
[jibunAddr] => 서울특별시 마포구 합정동 55-1
[siNm] => 서울특별시
[roadAddrPart1] => 서울특별시 마포구 토정로 56
[bdNm] =>
[admCd] => 1144012200
[udrtYn] => 0
[lnbrMnnm] => 55
[roadAddr] => 서울특별시 마포구 토정로 56 (합정동)
[lnbrSlno] => 1
[buldMnnm] => 56
[bdKdcd] => 0
[liNm] =>
[rnMgtSn] => 114403113023
[mtYn] => 0
[bdMgtSn] => 1144011800100010000009632
[buldSlno] => 0
)
[1] => stdClass Object
(
[detBdNmList] =>
[engAddr] => 35, Tojeong-ro 4-gil, Mapo-gu, Seoul
[rn] => 토정로4길
[emdNm] => 합정동
[zipNo] => 04085
[roadAddrPart2] => (합정동, 신성빌라)
[sggNm] => 마포구
[jibunAddr] => 서울특별시 마포구 합정동 75-10 신성빌라
[siNm] => 서울특별시
[roadAddrPart1] => 서울특별시 마포구 토정로4길 35
[bdNm] => 신성빌라
[admCd] => 1144012200
[udrtYn] => 0
[lnbrMnnm] => 75
[roadAddr] => 서울특별시 마포구 토정로4길 35 (합정동, 신성빌라)
[lnbrSlno] => 10
[buldMnnm] => 35
[bdKdcd] => 1
[liNm] =>
[rnMgtSn] => 114404139606
[mtYn] => 0
[bdMgtSn] => 1144012200100750010024923
[buldSlno] => 0
)
[2] => stdClass Object
(
[detBdNmList] =>
[engAddr] => 13-5, Tojeong-ro 4an-gil, Mapo-gu, Seoul
[rn] => 토정로4안길
[emdNm] => 합정동
[zipNo] => 04085
[roadAddrPart2] => (합정동)
[sggNm] => 마포구
[jibunAddr] => 서울특별시 마포구 합정동 82-10
[siNm] => 서울특별시
[roadAddrPart1] => 서울특별시 마포구 토정로4안길 13-5
[bdNm] =>
[admCd] => 1144012200
[udrtYn] => 0
[lnbrMnnm] => 82
[roadAddr] => 서울특별시 마포구 토정로4안길 13-5 (합정동)
[lnbrSlno] => 10
[buldMnnm] => 13
[bdKdcd] => 0
[liNm] =>
[rnMgtSn] => 114404139607
[mtYn] => 0
[bdMgtSn] => 1144012200100820010012210
[buldSlno] => 5
)
[3] => stdClass Object
(
[detBdNmList] =>
[engAddr] => 19, Tojeong-ro 4an-gil, Mapo-gu, Seoul
[rn] => 토정로4안길
[emdNm] => 합정동
[zipNo] => 04085
[roadAddrPart2] => (합정동)
[sggNm] => 마포구
[jibunAddr] => 서울특별시 마포구 합정동 82-10
[siNm] => 서울특별시
[roadAddrPart1] => 서울특별시 마포구 토정로4안길 19
[bdNm] =>
[admCd] => 1144012200
[udrtYn] => 0
[lnbrMnnm] => 82
[roadAddr] => 서울특별시 마포구 토정로4안길 19 (합정동)
[lnbrSlno] => 10
[buldMnnm] => 19
[bdKdcd] => 0
[liNm] =>
[rnMgtSn] => 114404139607
[mtYn] => 0
[bdMgtSn] => 1144012200100820010024925
[buldSlno] => 0
)
[4] => stdClass Object
(
[detBdNmList] =>
[engAddr] => 13-4, Tojeong-ro 4an-gil, Mapo-gu, Seoul
[rn] => 토정로4안길
[emdNm] => 합정동
[zipNo] => 04085
[roadAddrPart2] => (합정동)
[sggNm] => 마포구
[jibunAddr] => 서울특별시 마포구 합정동 82-10
[siNm] => 서울특별시
[roadAddrPart1] => 서울특별시 마포구 토정로4안길 13-4
[bdNm] =>
[admCd] => 1144012200
[udrtYn] => 0
[lnbrMnnm] => 82
[roadAddr] => 서울특별시 마포구 토정로4안길 13-4 (합정동)
[lnbrSlno] => 10
[buldMnnm] => 13
[bdKdcd] => 0
[liNm] =>
[rnMgtSn] => 114404139607
[mtYn] => 0
[bdMgtSn] => 1144012200100820010012213
[buldSlno] => 4
)
)
)
)
[/code]
네이버 키워드 조회수 검색
네이버 키워드 조회수 검색
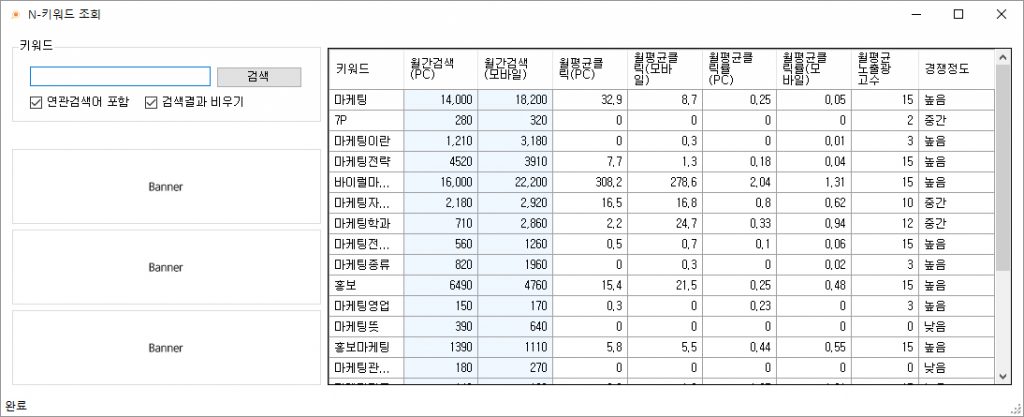
기능
특정 키워드가 네이버에서 어느정도 검색되는지 파악이 가능
검색한 키워드의 연관검색어 출력
개발언어
c#.net 4.0
게이트웨이 핑체크
Gateway ping 확인하는 스크립트
eth0 – 192.168.100.1
eth1 – 192.168.200.1
default gateway는 192.168.100.1 로 등록되어 있는 상태에서 192.168.100.1로 핑을 계속 보내면서 네트워크를 확인한다.
최대 실패횟수가 초과하면 현재 default gateway를 제거하고 eth1의 게이트웨이를 등록하고 관리자에게 이메일을 발송한다.
[code lang=”shell”]
#!/bin/sh
#####################################################################
# edit config
GW1="192.168.100.1"
GW2="192.168.200.1"
MAX_FAIL_COUNT=5
ERROR_MAILTO="me@jongwan.com"
#####################################################################
# path exec
EXEC_PING="/bin/ping"
EXEC_ROUTE="/sbin/route"
EXEC_MAIL="/usr/bin/mail"
#####################################################################
# prevent duplicate run
ME=`basename "$0"`
CHK_RUN=`pgrep -o $ME`
if [ $CHK_RUN -ne $$ ]; then
exit
fi
#####################################################################
# checking
FAIL_COUNT=0
while(true) do
# check ping
CHK=`$EXEC_PING -c1 $GW1 > /dev/null; echo $?`
# 0 is reachable, 2 is unreachable
if [ $CHK -ne "0" ]; then
FAIL_COUNT=$(($FAIL_COUNT+1))
else
FAIL_COUNT=0 # init fail_count if success ping
fi
# check fail count
if [ $FAIL_COUNT -ge $MAX_FAIL_COUNT ]; then
# add/del gateway
echo "Gateway connection failed : $GW1"
CMD1=`$EXEC_ROUTE del default gw $GW1`
CMD2=`$EXEC_ROUTE add default gw $GW2`
# send email
CMD3=`echo "Gateway connection failed : $GW1" | $EXEC_MAIL -s "Gateway connection failed : $GW1" $ERROR_MAILTO`
# exit shell
break
fi
sleep 1
done
[/code]
오늘은..
오늘은 내 생애 가장 젊은 날..
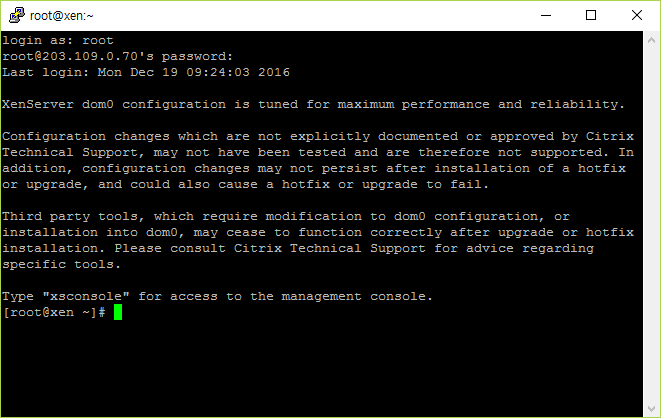
젠서버 VM 자동실행
젠서버 VM 자동실행
XenCenter 실행 > 콘솔
풀리스트 확인
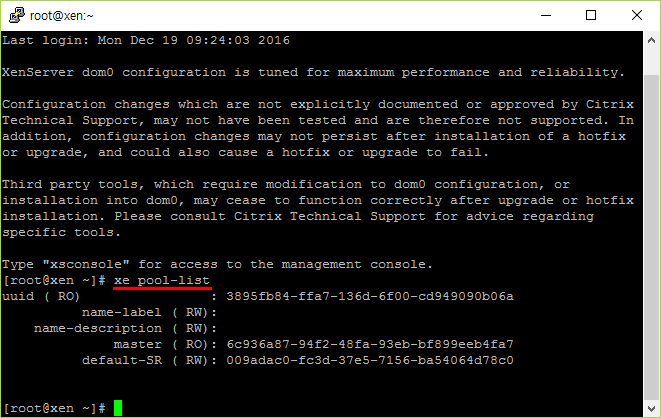
# xe pool-list
풀자동실행 변경
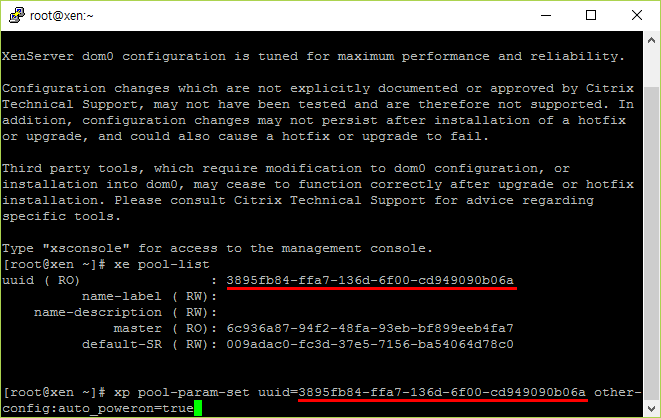
# xe pool-param-set uuid=UUID other-config:auto_poweron=true
가상서버 UUID 확인
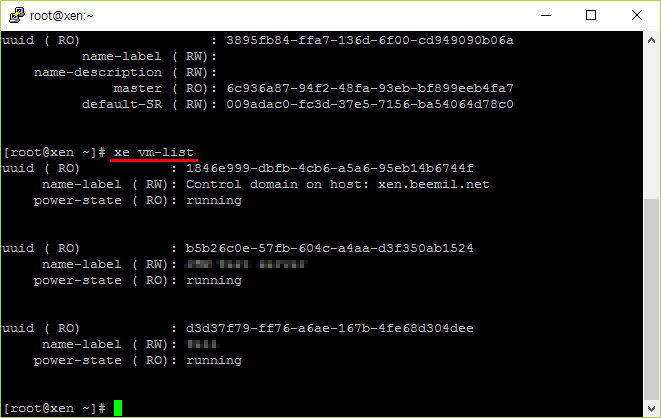
# xe vm-list
가상서버 자동실행 변경
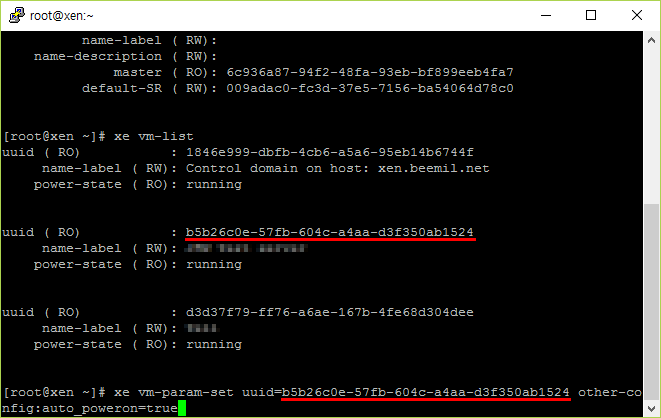
# xe vm-param-set uuid=UUID other-config:auth_poweron=true
ERR_RESPONSE_HEADERS_MULTIPLE_CONTENT_DISPOSITION
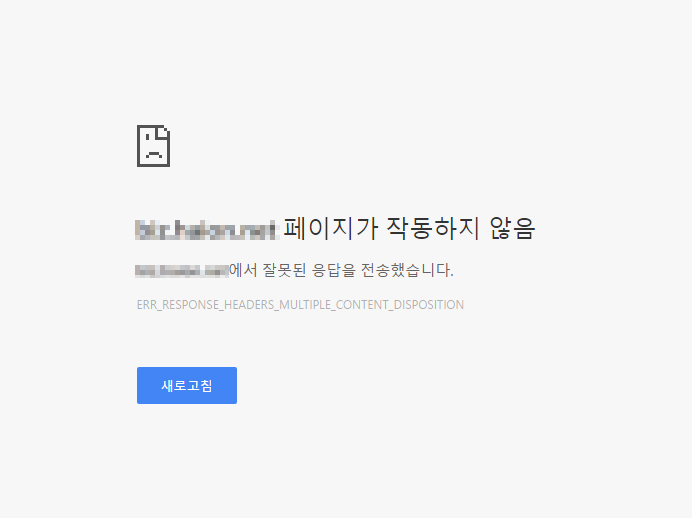
ERR_RESPONSE_HEADERS_MULTIPLE_CONTENT_DISPOSITION
어느날 갑자기 다운로드가 되지 않고 이런 오류메시지가 나와서 알아보니 크롬 최신버전에서 헤더가 변경되었다한다.
아래처럼 변경 (PHP)
Header(“Content-Disposition: attachment; filename=$filename”);
Header(“Content-Disposition: attachment; filename=\”$filename\”“);
파일명을 쌍따옴표로 묶어준다.
PHP – HTML DOM 파서
Simple Html DOM Parser
http://sourceforge.net/projects/simplehtmldom/
C#의 Html Agility Pack(https://htmlagilitypack.codeplex.com/)같이 PHP에서 사용이 가능한 DOM 파서가 필요해 구글링을 해보니 Simplehtmldom 이라는 좋은 라이브러리가 있었다.
네이버 연합뉴스의 제목만 가져오기
[code lang=”php”]
$html = file_get_html(‘http://news.naver.com/main/list.nhn?mode=LPOD&mid=sec&oid=422&listType=title’);
foreach($html->find(‘.list_body .type02 a’) as $e) {
echo $e->innertext;
}
[/code]
다음 연령별 뉴스의 모든 노드를 출력
[code lang=”php”]
$html = file_get_html(‘http://media.daum.net/ranking/age/’);
$dump = dump_html_tree($html);
echo "<xmp style=’text-align: left;’>";
print_r($dump);
echo "</xmp>";
[/code]
Google reCAPTCHA PHP (CURL/Snoopy) Sample
 Google reCAPTCHA
입력폼
[code lang=”html”]
<form onsubmit="return check_form()">
<input type="hidden" id="recaptcha_response" name="recaptcha_response" value="" />
<div id="recaptcha1"></div>
<button type="submit">확인</button>
</form>
[/code]
[code lang=”javascript”]
<script type="text/javascript">
var recaptchaWidger1;
var onloadCallback = function() {
recaptchaWidger1 = grecaptcha.render(‘recaptcha1’, {
‘sitekey’ : ‘{Site key}’
});
};
</script>
<script src="https://www.google.com/recaptcha/api.js?onload=onloadCallback&render=explicit" async defer></script>
<script>
function check_form() {
var recaptch_response = grecaptcha.getResponse(recaptchaWidger1);
if (!recaptch_response) {
alert("자동가입방지 문자를 확인해 주세요");
return false;
}
document.getElementById("recaptcha_response").value = recaptch_response;
return true;
}
</script>
[/code]
폼데이터 처리(1) – Snoopy.lib.php
[code lang=”php”]
include_once ‘Snoopy.class.php’;
$snoopy = new Snoopy;
$data = array(
"secret" => "Secret key",
"response" => $_POST[‘recaptcha_response’]
);
$snoopy->submit(‘https://www.google.com/recaptcha/api/siteverify’, $data);
$response = json_decode($snoopy->results);
if (!$response->success) {
exit("fail message");
}
[/code]
폼데이터 처리(2) – CURL
[code lang=”php”]
$ch = curl_init();
curl_setopt($ch, CURLOPT_URL, "https://www.google.com/recaptcha/api/siteverify");
curl_setopt($ch, CURLOPT_POST, true);
curl_setopt($ch, CURLOPT_POSTFIELDS, "secret={Secret key}&response=".$_POST[‘recaptcha_response’]);
curl_setopt($ch, CURLOPT_RETURNTRANSFER, true);
$output = curl_exec ($ch);
curl_close ($ch);
$response = json_decode($output);
if (!$response->success) {
exit("fail message");
}
[/code]
리눅스 hostname 변경
우분투에서 호스트네임을 변경하는 방법
hostname 파일 수정
#vim /etc/hostname
hostname 적용
#hostname -F /etc/hostname
hostname 확인
#hostname