아시아/서울로 변경하기
# timedatectl set-timezone 'Asia/Seoul'사용가능한 타임존 목록확인하기
# timedatectl list-timezonesHello world

# timedatectl set-timezone 'Asia/Seoul' # timedatectl list-timezones문자메시지 발송서비스 서버 구축을 위해서 mariadb (replication) 를 사용
1,000,000건/일 + @ 처리가 가능해야 한다
Xeon (16core)
samsung 860 pro 1Tb * 2 (RAID0)
32Gb memory
L4 : Active – Standby
mariadb : Master – Slave

http://mirror.kakao.com/ubuntu-releases/focal/
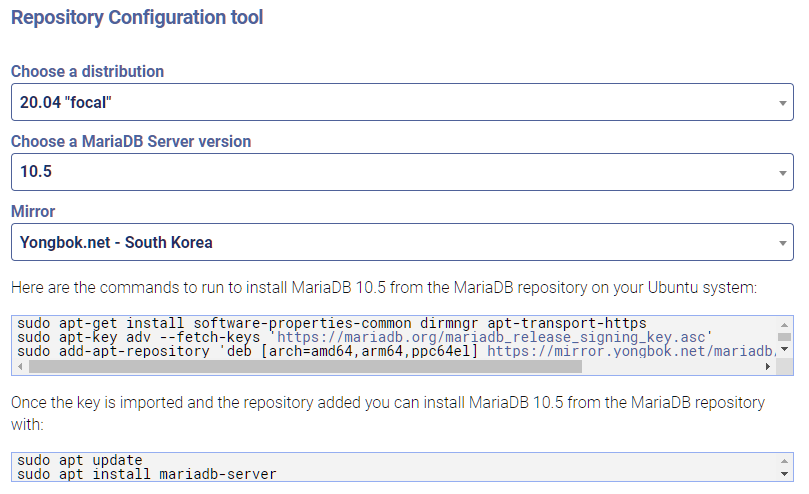
sudo apt-get install software-properties-common dirmngr apt-transport-https
sudo apt-key adv --fetch-keys 'https://mariadb.org/mariadb_release_signing_key.asc'
sudo add-apt-repository 'deb [arch=amd64,arm64,ppc64el] https://mirror.yongbok.net/mariadb/repo/10.5/ubuntu focal main'

sudo apt update
sudo apt install mariadb-server
mysql -uroot -p# create user username@localhost identified by 'password';
create user my@'%' identified by '1234';# grant select on database.table to username@localhost;
grant select on *.* to my@'%';# grant all privileges on database.table to username@localhost;
grant all privileges on *.* to my@'%';flush privileges;[mysqld]
server-id = 1
log_bin = /var/log/mysql/mysql-bin.logvim /etc/mysql/mariadb.conf.d/50-server.cnf
systemctl restart mariadb
Welcome to the MariaDB monitor.  Commands end with ; or \g.
 Your MariaDB connection id is 37
 Server version: 10.5.9-MariaDB-1:10.5.9+maria~focal-log mariadb.org binary distribution
 Copyright (c) 2000, 2018, Oracle, MariaDB Corporation Ab and others.
 Type 'help;' or '\h' for help. Type '\c' to clear the current input statement.
 MariaDB [(none)]> show master status;
 +------------------+----------+--------------+------------------+
 | File             | Position | Binlog_Do_DB | Binlog_Ignore_DB |
 +------------------+----------+--------------+------------------+
 | mysql-bin.000001 |     2098 |              |                  |
 +------------------+----------+--------------+------------------+
 1 row in set (0.000 sec)
 MariaDB [(none)]>
show master status;[mysqld]
server-id = 2
relay_log=mysql-relay-bin
log_slave_updates = 1
read_only = 1vim /etc/mysql/mariadb.conf.d/50-server.cnf
systemctl restart mariadb
Welcome to the MariaDB monitor.  Commands end with ; or \g.
 Your MariaDB connection id is 36
 Server version: 10.5.9-MariaDB-1:10.5.9+maria~focal mariadb.org binary distribution
 Copyright (c) 2000, 2018, Oracle, MariaDB Corporation Ab and others.
 Type 'help;' or '\h' for help. Type '\c' to clear the current input statement.

 MariaDB [(none)]> stop slave;
 MariaDB [(none)]> CHANGE MASTER TO
     -> MASTER_HOST='###.###.###.###',
     -> MASTER_PORT=3306,
     -> MASTER_USER='repl',
     -> MASTER_PASSWORD='1234',
     -> MASTER_LOG_FILE='mysql-bin.000001',
     -> MASTER_LOG_POS=2098;
 MariaDB [(none)]> start slave;
MariaDB [(none)]> show slave status \G;
* 1. row *
Slave_IO_State: Waiting for master to send event
Master_Host: ###.###.###.###
Master_User: repl
Master_Port: 3306
Connect_Retry: 60
Master_Log_File: mysql-bin.000001
Read_Master_Log_Pos: 2098
Relay_Log_File: mysql-relay-bin.000002
Relay_Log_Pos: 906
Relay_Master_Log_File: mysql-bin.000001
Slave_IO_Running: Yes
Slave_SQL_Running: Yes
Replicate_Do_DB:
Replicate_Ignore_DB:
Replicate_Do_Table:
Replicate_Ignore_Table:
Replicate_Wild_Do_Table:
Replicate_Wild_Ignore_Table:
Last_Errno: 0
Last_Error:
Skip_Counter: 0
Exec_Master_Log_Pos: 2098
Relay_Log_Space: 1215
Until_Condition: None
Until_Log_File:
Until_Log_Pos: 0
Master_SSL_Allowed: No
Master_SSL_CA_File:
Master_SSL_CA_Path:
Master_SSL_Cert:
Master_SSL_Cipher:
Master_SSL_Key:
Seconds_Behind_Master: 0
Master_SSL_Verify_Server_Cert: No
Last_IO_Errno: 0
Last_IO_Error:
Last_SQL_Errno: 0
Last_SQL_Error:
Replicate_Ignore_Server_Ids:
Master_Server_Id: 1
Master_SSL_Crl:
Master_SSL_Crlpath:
Using_Gtid: No
Gtid_IO_Pos:
Replicate_Do_Domain_Ids:
Replicate_Ignore_Domain_Ids:
Parallel_Mode: optimistic
SQL_Delay: 0
SQL_Remaining_Delay: NULL
Slave_SQL_Running_State: Slave has read all relay log; waiting for more updates
Slave_DDL_Groups: 3
Slave_Non_Transactional_Groups: 0
Slave_Transactional_Groups: 0
1 row in set (0.000 sec)
ERROR: No query specified
MariaDB [(none)]>show slave status \G;# apt update && apt upgrade -y
# apt install dante-server dante-clientlogoutput: syslog stdout /var/log/dante.log
internal: eth0 port = 1080
external: eth1
clientmethod: none
socksmethod: none
user.privileged: proxy
user.unprivileged: nobody
user.libwrap: nobody
client pass {
from: 0.0.0.0/0 to: 0.0.0.0/0
log: error connect disconnect
}
socks pass {
from: 0.0.0.0/0 to: 0.0.0.0/0
log: connect error disconnect
}/etc/danted.conf
프록시 서버는 eth0에서 LISTEN, 트래픽은 eth1으로 나가게 한다.
eth0와 eth1은 각각 공인아이피를 셋팅했다.
# curl -x socks5://{프록시아이피}:{프록시포트} https://www.google.comroute {
from: 0.0.0.0/0 to: 0.0.0.0/0 via: {프록시아이피} port = {프록시포트}
protocol: tcp udp
proxyprotocol: socks_v4 socks_v5
method: none
}/etc/dante.conf
dante-client 패키지를 설치하면 socksify를 사용할 수 있다.
위에처럼 설정하고 아래 명령을 사용하는 방법도 있다.
이 경우에는 socksify를 사용하는 프로세스는 모두 지정한 프록시를 통해서 통신이 된다.
# socksify wget -O- -q https://google.com# yum update
# yum install wget패키지 업데이트를 먼저한다
# cd /usr/local/src
# wget https://yum.oracle.com/repo/OracleLinux/OL7/latest/x86_64/getPackage/oracle-database-preinstall-18c-1.0-1.el7.x86_64.rpm
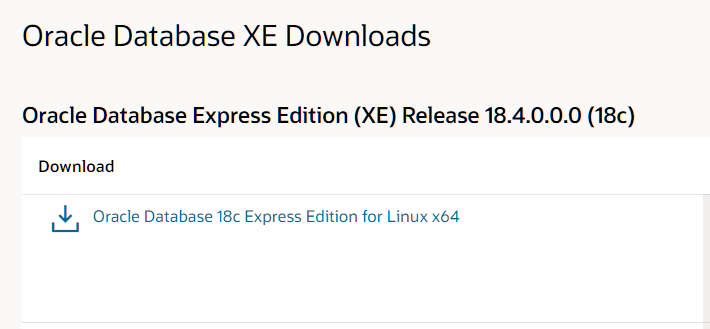
# wget https://download.oracle.com/otn-pub/otn_software/db-express/oracle-database-xe-18c-1.0-1.x86_64.rpm설치파일 다운로드는 아래 링크에서 한다.
https://www.oracle.com/database/technologies/xe-downloads.html
# yum -y localinstall oracle-database-preinstall-18c-1.0-1.el7.x86_64.rpm
# yum -y localinstall oracle-database-xe-18c-1.0-1.x86_64.rpm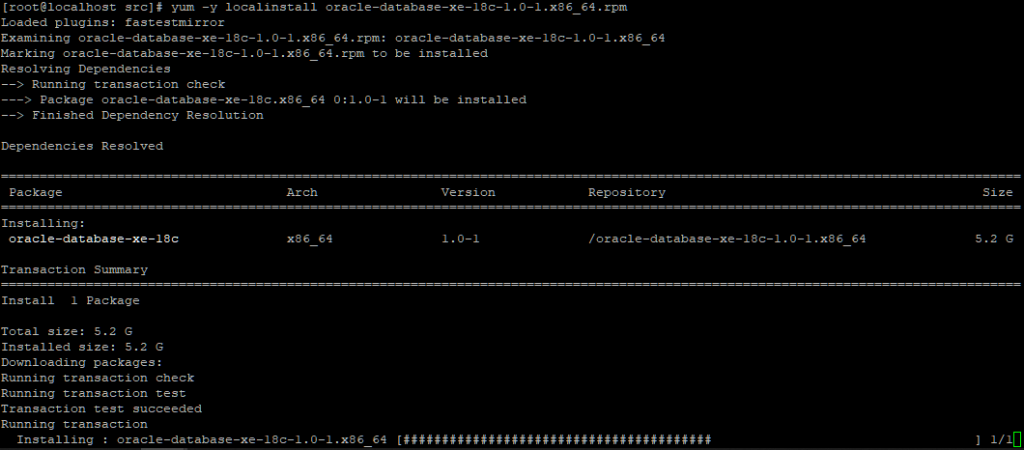
설치 사이즈가 커서 오래걸린다
# /etc/init.d/oracle-xe-18c configure

Specify a password to be used for database accounts. Oracle recommends that the password entered should be at least 8 characters in length, contain at least 1 uppercase character, 1 lower case character and 1 digit [0-9]. Note that the same password will be used for SYS, SYSTEM and PDBADMIN accounts:
 Confirm the password:
 Configuring Oracle Listener.
 Listener configuration succeeded.
 Configuring Oracle Database XE.
 Enter SYS user password:
 Enter SYSTEM user password:

 Enter PDBADMIN User Password:

 Prepare for db operation
 7% complete
 Copying database files
 29% complete
 Creating and starting Oracle instance
 30% complete
 31% complete
 34% complete
 38% complete
 41% complete
 43% complete
 Completing Database Creation
 47% complete
 50% complete
 Creating Pluggable Databases
 54% complete
 71% complete
 Executing Post Configuration Actions
 93% complete
 Running Custom Scripts
 100% complete
 Database creation complete. For details check the logfiles at:
  /opt/oracle/cfgtoollogs/dbca/XE.
 Database Information:
 Global Database Name:XE
 System Identifier(SID):XE
 Look at the log file "/opt/oracle/cfgtoollogs/dbca/XE/XE1.log" for further details.
 Connect to Oracle Database using one of the connect strings:
      Pluggable database: localhost.localdomain/XEPDB1
      Multitenant container database: localhost.localdomain
 Use https://localhost:5500/em to access Oracle Enterprise Manager for Oracle Database XE
비밀번호는 최소 1개의 대문자와 소문자, 숫자를 조합해서 8자이상 입력해야 한다.
# vi ~/.bash_profile

export ORACLE_HOME=/opt/oracle/product/18c/dbhomeXE
export TNS_ADMIN=$ORACLE_HOME/network/admin
export ORACLE_SID=XE
export ORAENV_ASK=NO
export PATH=$PATH:$ORACLE_HOME/bin
.bash_profile 파일 하단에 환경설정을 추가
# lsnrctl status

LSNRCTL for Linux: Version 18.0.0.0.0 - Production on 01-FEB-2021 11:02:03
 Copyright (c) 1991, 2018, Oracle.  All rights reserved.
 Connecting to (DESCRIPTION=(ADDRESS=(PROTOCOL=TCP)(HOST=localhost)(PORT=1521)))
 STATUS of the LISTENER
 Alias                     LISTENER
 Version                   TNSLSNR for Linux: Version 18.0.0.0.0 - Production
 Start Date                01-FEB-2021 11:01:04
 Uptime                    0 days 0 hr. 0 min. 58 sec
 Trace Level               off
 Security                  ON: Local OS Authentication
 SNMP                      OFF
 Default Service           XE
 Listener Parameter File   /opt/oracle/product/18c/dbhomeXE/network/admin/listener.ora
 Listener Log File         /opt/oracle/diag/tnslsnr/localhost/listener/alert/log.xml
 Listening Endpoints Summary…
   (DESCRIPTION=(ADDRESS=(PROTOCOL=tcp)(HOST=localhost)(PORT=1521)))
   (DESCRIPTION=(ADDRESS=(PROTOCOL=ipc)(KEY=EXTPROC1521)))
   (DESCRIPTION=(ADDRESS=(PROTOCOL=tcps)(HOST=localhost)(PORT=5500))(Security=(my_wallet_directory=/opt/oracle/product/18c/dbhomeXE/admin/XE/xdb_wallet))(Presentation=HTTP)(Session=RAW))
 Services Summary…
 Service "XE" has 1 instance(s).
   Instance "XE", status READY, has 1 handler(s) for this service…
 Service "XEXDB" has 1 instance(s).
   Instance "XE", status READY, has 1 handler(s) for this service…
 Service "ba3db2e4206012dde055000000000001" has 1 instance(s).
   Instance "XE", status READY, has 1 handler(s) for this service…
 Service "xepdb1" has 1 instance(s).
   Instance "XE", status READY, has 1 handler(s) for this service…
The command completed successfully[root@localhost admin]# cat listener.ora
listener.ora Network Configuration File: /opt/oracle/product/18c/dbhomeXE/network/admin/listener.ora
Generated by Oracle configuration tools.
DEFAULT_SERVICE_LISTENER = XE
LISTENER =
(DESCRIPTION_LIST =
(DESCRIPTION =
(ADDRESS = (PROTOCOL = TCP)(HOST = localhost)(PORT = 1521))
(ADDRESS = (PROTOCOL = IPC)(KEY = EXTPROC1521))
)
)[root@localhost admin]# cat tnsnames.ora
tnsnames.ora Network Configuration File: /opt/oracle/product/18c/dbhomeXE/network/admin/tnsnames.ora
Generated by Oracle configuration tools.
XE =
(DESCRIPTION =
(ADDRESS = (PROTOCOL = TCP)(HOST = localhost)(PORT = 1521))
(CONNECT_DATA =
(SERVER = DEDICATED)
(SERVICE_NAME = XE)
)
)
LISTENER_XE =
(ADDRESS = (PROTOCOL = TCP)(HOST = localhost)(PORT = 1521))포트번호가 바뀐경우가 있었는데, 그럴경우에 1521로 변경해서 저장하고 재시작 해준다
# sqlplus
SQL*Plus: Release 18.0.0.0.0 - Production on Mon Feb 1 12:59:38 2021
Version 18.4.0.0.0
Copyright (c) 1982, 2018, Oracle.  All rights reserved.
Enter user-name: system
Enter password:
Last Successful login time: Mon Feb 01 2021 11:23:03 +09:00
Connected to:
Oracle Database 18c Express Edition Release 18.0.0.0.0 - Production
Version 18.4.0.0.0
SQL># /etc/init.d/oracle-xe-18c start
# /etc/init.d/oracle-xe-18c stopLet’s Encrypt 에서 발급하는 90일짜리 무료 인증서입니다. 3개월에 한번씩 인증을 해야하지만 자동업데이트를 이용하면 쉽게 사용할 수 있습니다.
$ snap install --classic certbot우분투 18.04 기준 snap로 certbot를 설치합니다.
// 아파치
$ certbot --apache

// nginx
$ certbot --nginx
certbot 명령을 이용해서 SSL인증서를 발급받습니다. 옵션을 이용해서 웹서버를 지정합니다.
$ certbot --nginx --nginx-server-root /usr/local/nginx/conf/ --nginx-ctl /usr/local/nginx/sbin/nginxnginx 설치위치를 직접지정할 경우
Plugins selected: Authenticator apache, Installer apache
 Enter email address (used for urgent renewal and security notices)
  (Enter 'c' to cancel):
이메일주소를 입력합니다. 인증서 만료전에 이메일로 알려줍니다.
Please read the Terms of Service at
 https://letsencrypt.org/documents/LE-SA-v1.2-November-15-2017.pdf. You must
 agree in order to register with the ACME server. Do you agree?

 (Y)es/(N)o: Y

 Would you be willing, once your first certificate is successfully issued, to
 share your email address with the Electronic Frontier Foundation, a founding
 partner of the Let's Encrypt project and the non-profit organization that
 develops Certbot? We'd like to send you email about our work encrypting the web,
 EFF news, campaigns, and ways to support digital freedom.

 (Y)es/(N)o: Y
 Account registered.
이용약관에 동의합니다.
Which names would you like to activate HTTPS for?

 1: jongwan.com
 2: www.jongwan.com

 Select the appropriate numbers separated by commas and/or spaces, or leave input
 blank to select all options shown (Enter 'c' to cancel):
인증서를 발급받을 도메인을 선택합니다. 공백으로 엔터를 누르면 모두 발급합니다. jongwan.com, www.jongwan.com을 모두 받으므로 그냥 엔터를 입력합니다.
Requesting a certificate for jongwan.com and www.jongwan.com
 Performing the following challenges:
 http-01 challenge for jongwan
 http-01 challenge for www.jongwan
 Waiting for verification…
 Cleaning up challenges
 Created an SSL vhost at /etc/apache2/sites-available/jongwan_com-le-ssl.conf
 Deploying Certificate to VirtualHost /etc/apache2/sites-available/jongwan_com-le-ssl.conf
 Enabling available site: /etc/apache2/sites-available/jongwan_com-le-ssl.conf
 Deploying Certificate to VirtualHost /etc/apache2/sites-available/jongwan_com-le-ssl.conf
 Redirecting vhost in /etc/apache2/sites-enabled/jongwan_com.conf to ssl vhost in /etc/apache2/sites-available/jongwan_com-le-ssl.conf

 Congratulations! You have successfully enabled https://jongwan.com and
 https://www.jongwan.com

 Subscribe to the EFF mailing list (email: me@jongwan.com).
 IMPORTANT NOTES:
 Congratulations! Your certificate and chain have been saved at:
 /etc/letsencrypt/live/jongwan.com/fullchain.pem
 Your key file has been saved at:
 /etc/letsencrypt/live/jongwan.com/privkey.pem
 Your certificate will expire on 2021-04-15. To obtain a new or
 tweaked version of this certificate in the future, simply run
 certbot again with the "certonly" option. To non-interactively
 renew all of your certificates, run "certbot renew"
 If you like Certbot, please consider supporting our work by:
 Donating to ISRG / Let's Encrypt:   https://letsencrypt.org/donate
 Donating to EFF:                    https://eff.org/donate-le
인증서를 발급중입니다.
$ certbot renewrenew 옵션을 이용해서 인증서를 자동갱신할 수 있습니다.
–dry-run 옵션을 추가하면 발급 테스트도 가능합니다.
Saving debug log to /var/log/letsencrypt/letsencrypt.log

 Processing /etc/letsencrypt/renewal/jongwan.com.conf

 Cert not yet due for renewal

 The following certificates are not due for renewal yet:
   /etc/letsencrypt/live/jongwan.com/fullchain.pem expires on 2021-04-15 (skipped)
 No renewals were attempted.
실행해보면 아래처럼 나옵니다. 방금 인증서를 받았기 때문에 갱신이 되지는 않고 메시지만 출력됩니다.
$ crontab -e// 매일 0시 업데이트 진행
0 0 * * * sudo certbot renewcrontab에 등록해서 자동으로 갱신하도록 합니다.
우분투 16버전에서 php5.6 설치하는 방법
sudo add-apt-repository -y ppa:ondrej/php
sudo apt update
sudo apt install php5.6 php5.6-mysql php5.6-curltcpdump -i eth0 -s 0 -A 'tcp dst port 80 and (tcp[((tcp[12:1] & 0xf0) >> 2):4] = 0x504f5354)'
tcpdump -i eth0 -s 0 -A 'tcp dst port 80 and tcp[((tcp[12:1] & 0xf0) >> 2):4] = 0x47455420'
xubuntu에서 vino 사용을 위한 설정
#apt install vino
#gsettings set org.gnome.Vino notify-on-connect false
#gsettings set org.gnome.Vino disable-background false
#gsettings set org.gnome.Vino require-encryption false
#gsettings set org.gnome.Vino prompt-enabled false
#gsettings set org.gnome.Vino vnc-password 1234
#gsettings set org.gnome.Vino view-only true
#cp /usr/share/applications/vino-server.desktop /etc/xdg/autostart/
이전버전에서는 vino를 설치하지만 우분투 18.04이상에서는 기본적으로 vino가 설치되어 있다. 따라서 설정 > share > 데스크탑 공유 켜기만 하면 된다.
Apache Traffic Server를 apt로 설치하고
systemctl start trafficserver로 시작하려면 정상적으로 시작을 하지 않는 경우가 있다.
이런경우 아래처럼 디렉토리를 생성시켜주면 정상적으로 시작이 된다
$ mkdir /var/run/trafficserver
$ chown trafficserver:trafficserver /var/run/trafficserver
systemctl status trafficserver로 확인해보면
/var/run/trafficserver 를 생성시켜주지 못해서 오류가 나면서 종료되는 문제이다.
서버 시작시 서비스가 실행되도록 하려면 아래처럼 한다
$ systemctl enable trafficserver
이렇게 시작 서비스에 등록을 하더라도 재부팅하면 /var/run/trafficserver 디렉토리가 없어지면서
서비스가 정상적으로 시작되지 않는다.
서비스 시작 스크립트를 수정해서 해결한다
$ vim /lib/systemd/system/trafficserver.service
아래코드를 삽입해준다.
서비스 시작전에 실행하는 커맨드를 이용해서 폴더를 생성시켜준다.
ExecStartPre=/bin/mkdir /var/run/trafficserver
ExecStartPre=/bin/chown trafficserver:trafficserver /var/run/trafficserver
전체파일내용은 아래와 같다
[Unit]
Description=Apache Traffic Server is a fast, scalable and extensible caching proxy server.
Documentation=man:traffic_server(8)
After=network.target[Service]
Type=simple
EnvironmentFile=-/etc/default/trafficserver
PIDFile=/var/run/trafficserver/cop.pid
ExecStartPre=/bin/mkdir /var/run/trafficserver
ExecStartPre=/bin/chown trafficserver:trafficserver /var/run/trafficserver
ExecStart=/usr/bin/traffic_cop $TC_DAEMON_ARGS
ExecReload=/usr/bin/traffic_ctl config reload[Install]
WantedBy=multi-user.target
우분투 12.04에서 iptables와 geoip를 이용해서 국가단위로 접근을 제한하는 방법을 안내합니다.
# sudo apt-get install xtables-addons-common
# sudo apt-get install libtext-csv-xs-perl
# sudo /usr/lib/xtables-addons/xt_geoip_dl
# sudo mkdir /usr/share/xt_geoip
# sudo /usr/lib/xtables-addons/xt_geoip_build -D /usr/share/xt_geoip *.csv
# iptables -A INPUT -m geoip –src-cc CN,IN,RU,JP -j DROP
# iptables -A INPUT -m geoip ! –src-cc KR -j DROP
-m geoip 사용시 아래와 같은 오류발생
iptables: No chain/target/match by that name.
xtables-addons-1.47.1 소스코드 다운로드
최신버전인 3.x는 우분투 12.04의 커널버전이 낮아서 사용할 수 없으니 1.x 버전을 사용해야 한다
# wget https://sourceforge.net/projects/xtables-addons/files/Xtables-addons/xtables-addons-1.47.1.tar.xz/download
# xz -d xtables-addons-1.47.1.tar.xz
# tar xf xtables-addons-1.47.1.tar
# cd xtables-addons-1.47
# ./configure
# make && make install
아래명령을 실행해서 ‘geoip’ 가 있는지 확인
#cat /proc/net/ip_tables_matches
conntrack
conntrack
conntrack
state
geoip
udplite
udp
tcp
multiport
icmp